Facebook Live Streaming: Connect Your IP Camera
Stream your IP camera to Facebook Live with webcam.io. Show your live feed on your Facebook page, in your timeline, and embed it on your website.
Overview
Why Facebook Live?
| Advantage | Description |
|---|---|
| Reach your audience | Stream directly to your Facebook followers |
| Timeline integration | Live video appears in your feed |
| Continuous streaming | Supports 24/7 live video |
| Free hosting | Facebook handles all viewer traffic |
| Mobile notifications | Followers notified when you go live |
Requirements
| Requirement | Details |
|---|---|
| webcam.io Plan | LIVE (H.264) or LIVE+ (transcoding) |
| Facebook Account | Personal profile or Facebook Page |
| Camera | IP camera with RTSP/HTTP stream |
| Bandwidth | Minimum 1 Mbps upload |
Limitations
- Stream keys expire and change frequently
- “Continuous Live Video” requires manual setup
- Embedding requires copying code before going live
- Clicking “Finish” ends the stream permanently
Step 1: Get Your Camera Stream URL
Find your camera’s streaming URL:
rtsp://IP-ADDRESS:554/Streaming/Channels/101      (Hikvision)
rtsp://IP-ADDRESS:554/cam/realmonitor?channel=1   (Dahua)
rtsp://IP-ADDRESS/live/ch00_1                     (Axis)
Requirements:
- H.264 encoding recommended
- MJPEG/MxPEG work with transcoding (LIVE+ plan)
- Camera must be accessible from the internet (port forwarding required)
See Live Streaming Setup for detailed camera configuration.
Step 2: Set Up Facebook Live
Create a Live Video Post
- Go to your Facebook Page or Profile
- Create a new post
- Select Live Video as the post type
- Select Connect (not the built-in webcam option)
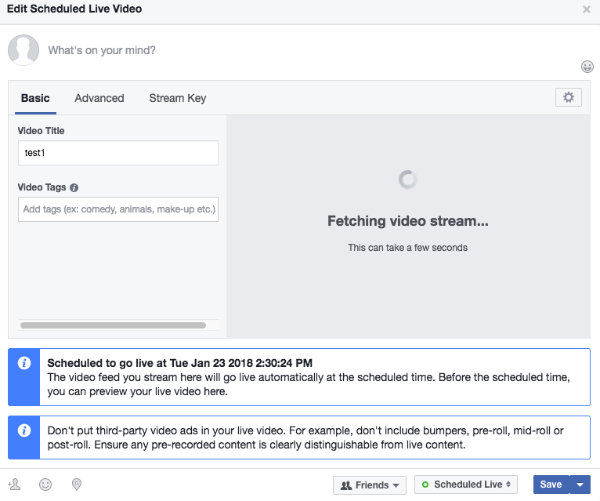
Schedule the Stream
- Click Schedule (lower right)
- The post appears in your timeline as “Scheduled”
- Click Broadcaster Only: Edit Your Details to access stream settings
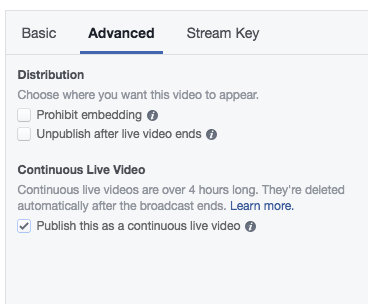
Enable Continuous Live Video
Without this setting, Facebook will end your stream after a few hours.
- In the stream settings, go to Advanced
- Enable Continuous Live Video
- Save the setting
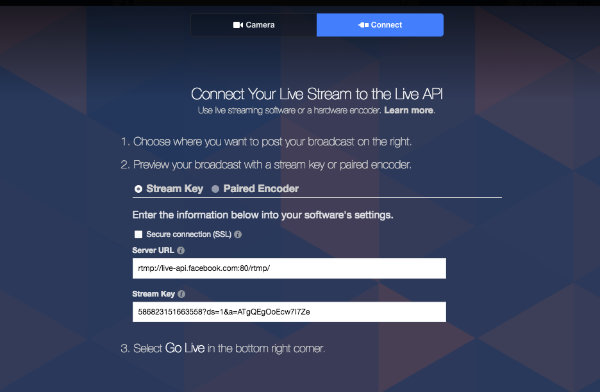
Get Your Stream Key
- Go to the Stream Key menu
- Copy the Server URL and Stream Key
- Keep this page open for the next step
Example values:
| Field | Example |
|---|---|
| Server URL | rtmp://live-api.facebook.com:80/rtmp/ |
| Stream Key | 586823151663558?ds=1&a=ATgQEgOoEcw7I7Ze |
Step 3: Set Up webcam.io
Create Live Stream Entry
- Go to webcam.io Dashboard
- Click Add Webcam → Select Live Stream
Configure Input
| Field | Value |
|---|---|
| Input URL | Your camera’s RTSP URL |
| Input Type | default |
Configure Output
Combine the Facebook Server URL and Stream Key:
rtmp://live-api.facebook.com:80/rtmp/586823151663558?ds=1&a=ATgQEgOoEcw7I7ZeFormat: SERVER-URL + STREAM-KEY
Transcoding Settings
| Camera Type | Transcoding |
|---|---|
| H.264 | Off (copy stream) |
| MJPEG | Required (LIVE+ plan) |
| Mobotix MxPEG | Required (LIVE+ plan) |
Enable Backup Stream (Recommended)
Enable the Backup Stream feature if your camera connection is unreliable. This keeps Facebook from ending the live video during brief interruptions.
Save and Start
- Check Enable Streaming
- Click Save
- Streaming starts within 30-60 seconds
Step 4: Go Live
Verify Stream in webcam.io
Check the Status box in your Dashboard:
| Status | Meaning |
|---|---|
| 🟢 OK | Data being sent to Facebook |
| 🔄 Restarting | Reconnecting |
| 🔴 Error | Check configuration |
Verify in Facebook
- Return to your Facebook stream settings
- Go to the Basic menu
- After a few minutes, you should see the live video preview
Copy Embed Code (Important!)
The embed code is only accessible before clicking “Save” to go live. Copy it now or you won’t be able to embed later.
- Click the gear icon (upper right of settings)
- Select Embed
- Copy the iframe code to a text file
Start Broadcasting
- Verify everything looks correct
- Click Save
- Your stream is now live on Facebook!
Embedding on Your Website
Using the Embed Code
If you copied the embed code before going live:
<iframe
  src="https://www.facebook.com/plugins/video.php?href=https%3A%2F%2Fwww.facebook.com%2FYOUR-PAGE%2Fvideos%2FVIDEO-ID%2F&show_text=false&width=560"
  width="560"
  height="315"
  style="border:none;overflow:hidden"
  scrolling="no"
  frameborder="0"
  allowfullscreen="true"
  allow="autoplay; clipboard-write; encrypted-media; picture-in-picture; web-share">
</iframe>
Facebook Page Plugin (Alternative)
Embed your entire Facebook Page with live video:
<iframe
  src="https://www.facebook.com/plugins/page.php?href=https%3A%2F%2Fwww.facebook.com%2FYOUR-PAGE&tabs=timeline&width=340&height=500"
  width="340"
  height="500"
  style="border:none;overflow:hidden"
  scrolling="no"
  frameborder="0">
</iframe>
Responsive Embed
<div style="position: relative; padding-bottom: 56.25%; height: 0;">
  <iframe
    src="YOUR-FACEBOOK-EMBED-URL"
    style="position: absolute; top: 0; left: 0; width: 100%; height: 100%;"
    frameborder="0"
    allowfullscreen>
  </iframe>
</div>Troubleshooting
Stream Ended Unexpectedly
Cause: Facebook ended the live video.
Solutions:
| Issue | Solution |
|---|---|
| Short interruption | Enable Backup Stream in webcam.io |
| Continuous video not enabled | Re-enable in Facebook settings |
| Stream key expired | Create new Live Video post, get new key |
To restart:
- Create a new Live Video post in Facebook
- Get the new Stream Key
- Update the Output URL in webcam.io
Multiple “Restarting” in Dashboard
Cause: Facebook rejected the stream, but webcam.io keeps trying.
Solution:
- Check if Facebook ended the live video
- Create new Live Video post
- Update stream key in webcam.io
Stream Not Appearing in Facebook
| Issue | Solution |
|---|---|
| No preview | Wait 2-3 minutes |
| Wrong stream key | Verify key matches exactly |
| Camera not accessible | Check port forwarding |
Accidentally Clicked “Finish”
Unfortunately, clicking Finish in Facebook permanently ends the live video. You must:
- Create a new Live Video post
- Get a new Stream Key
- Update webcam.io with the new key
- Copy new embed code (if needed)
If you need to edit settings, use Save not Finish. Finish = End stream permanently.
Best Practices
For 24/7 Streaming
✅ Enable Continuous Live Video in Facebook
✅ Enable Backup Stream in webcam.io
✅ Never click "Finish" in Facebook
✅ Save embed code before going live
✅ Monitor stream daily
For Reliability
✅ Use H.264 camera (no transcoding needed)
✅ Ensure stable internet connection
✅ Set up alerts in webcam.io monitoring
✅ Have a plan for stream key rotation
For Embedding
✅ Copy embed code BEFORE going live
✅ Test embed in incognito browser
✅ Consider YouTube/Twitch for easier embedding
Facebook vs Alternatives
| Feature | YouTube | Twitch | |
|---|---|---|---|
| Embedding ease | ⚠️ Tricky | ⚠️ Needs permissions | ✅ Easy |
| 24/7 streaming | ✅ Yes | ✅ Yes | ✅ Yes |
| Stream key stability | ❌ Changes often | ✅ Stable | ✅ Stable |
| Audience reach | Your followers | Everyone | Gaming/IRL community |
| Archive videos | Optional | Auto-created | Optional |
Recommendation: If you primarily want to embed on your website, YouTube or Twitch are more reliable. Use Facebook if reaching your Facebook audience is the priority.
FAQ
Is Facebook Live free?
Yes, Facebook Live is free. You need a webcam.io LIVE or LIVE+ plan for the streaming service.
How long can I stream?
With “Continuous Live Video” enabled, indefinitely. Without it, streams may be limited to 8 hours.
Can I stream to multiple Facebook pages?
Yes, but each needs its own webcam.io Live Stream entry with a unique stream key.
Why does my stream key keep changing?
Facebook generates new stream keys for each Live Video post. Unlike YouTube, you can’t reuse keys.
Can viewers comment on my live video?
Yes, Facebook Live includes real-time comments. You can moderate them in Facebook settings.
What happens when I stop streaming?
The live video becomes a regular video post on your page/timeline (unless you delete it).
Next Steps
- Live Streaming Setup – Camera connection basics
- YouTube Streaming – More stable alternative
- Twitch Streaming – Easier embedding
- Streaming FAQ – Common questions